Congratulations to Rosie from DIY Couture for exceeding her fundraising target for RNIB’s Wear Dots Raise Lots campaign. For those of you who didn’t noticed the profusion of spots on IG recently, Rosie set her own challenge for sewists to make something dotty, donate to the campaign and post a picture on social media during October.
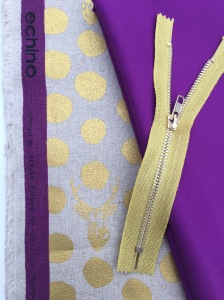
I hadn’t even thought about taking part but, as previously mentioned, I bought this fabric from The Eternal Maker on my day out with Vintage Rock Chick. Gold spots and stags heads for a party skirt! I already had the sparkly gold zip but had never before found the right project to use it on.
I’d had Simplicity 1109 for a while and thought it might work. A quick bedsheet toile later and I realised that I really loved this pattern.


I made a size 12 toile but sized down to a 10 for the final version. The advantage of this pattern is that you really only need to toile the waistband and, if that works, the rest should be fine. However, I toiled the whole thing to (a) see exactly how the pleats worked and (b) practice the exposed zip insertion. The pleats are actually pretty straightforward as long as you mark them up carefully to make sure you know which direction you’re pleating in. I did have a dimwitted moment when I thought I’d cut the waistband incorrectly until I realised I was trying to match up the side seam of the waistband with the side seam of the skirt section. Once you’ve made the pleats the original side seam is no longer at the side – which is why there are notches to match up! Concentrate Jane!
Onto the final version. Early on I realised the fabric was not wide enough to accommodate the considerable width of the front section of the skirt. There was going to be a Plan B with another fabric but I REALLY wanted to use those gold spots. A couple of helpful people on IG suggested hiding a join in a pleat and that’s what I did.
I cut out the two back pieces then cut the remaining fabric into two strips and carefully pattern matched them (as carefully as I ever pattern match anything). Rather than cut the fabric on the fold, I traced out a duplicate pattern piece and joined them together so that I could move the whole front section around on the fabric to so that the join hit just the right point of a pleat to ensure it was hidden as well as it could be.
I’d been pretty gung-ho with a marker pen when I was making the toile to show when the pleats went but I was obviously more cautious with the real thing. I used lots of tailor tacks and bits of post-it note instead. Once you join the front and the back pieces together you are left with a fairly substantial piece of fabric to attach to the waistband!


I decided to add a lining to make sure I achieved maximum fullness from this skirt. I’d set my heart on a purple swishy lining fabric but couldn’t find anything locally. I had to go up to London last week and it so happened I had a few minutes to spare before my work appointment so I went one stop in the ‘wrong’ direction on the tube to Sloane Square and found exactly what I wanted in Peter Jones for £3 a metre.
I cut the lining fabric to exactly the same size as the skirt but rather than pleat the top I gathered it and attached it to the waistband facing which worked OK. My only slight reservation is that I should have cut the lining slightly longer, particularly as I ended up using a smaller hem on the skirt than I’d originally intended so there’s more of a gap between the bottom of the lining and the hem of the skirt than I would have liked but who is going to notice!
I’ve tried what I would call a semi-exposed zip before and not liked it but this one is completely exposed and given its very sparkly nature it really needed to be on show. I think it was a success. The only thing I did differently from the pattern instruction was to hand stitch the bottom of the zip before flipping it up because my machine wasn’t happy sewing past the rather chunky zip stop. I used a gold thread to stitch the zip which worked well. Thank goodness I didn’t need to unpick it because the stitches disappeared into the zip completely! A tip for using metallic thread on the sewing machine – which may be obvious but wasn’t to me straightaway – use a plain thread for the bobbin. My first attempt resulted in split thread and machine unhappiness.
I then got completely carried away with the whole metallic theme and bought gold bias binding to finish the hem! It was quite stiff which has had the effect of making the skirt really swirly and “sticky-outy” which is exactly what I wanted! I also used the metallic thread to hand sew the bias binding to the main fabric. Another tip – go very slowly when hand sewing with this thread, it snarls up/splits very easily.


I love this skirt. I don’t know what else to say other than that I can really recommend this pattern, I think it would work with all sorts of fabrics. I’m planning a denim one too. Or maybe another sparkly one.

Congratulations!!!
LikeLiked by 1 person
Wow, perfect skirt for the upcoming party season.
LikeLiked by 1 person
Thank you! I’m definitely sorted on the party front!
LikeLike
You are so clever. That is really pretty.
LikeLiked by 1 person
Thank you – glad you like it!
LikeLike
Jane – I absolutely LOVE this skirt – well done for sticking with the original pattern, and hanging on for the perfect purple lining. And in a size 10 too. I’d be gatecrashing every Christmas party I could, if I were you x
LikeLiked by 1 person
Thank you! I’m so pleased with the way it’s turned out. x
LikeLike
Wow! I love it! It looks so classy!
I love pleated skirts but they don’t like me. I think the yoke would make it suit me!! I’m going to look out for this pattern! 😃
LikeLiked by 1 person
Thank you! Definitely try this pattern, it comes together surprisingly easily once you’ve got the pleats worked out. I’m going to try one without a lining next which will be even quicker.
LikeLiked by 1 person
Gorgeous skirt. I have also had the same problem with the lining ending up a bit too short due to a change of mind about the skirt length. I have added some lace to the bottom of the lining so that it is the right length and also, should you happen to flash the lining getting out of a car, you get a saucy glimpse of lace. It also gives me a excuse to browse through lovely loads of trims, if I haven’t already got some suitable lace in my stash.
LikeLiked by 1 person
Thank you! Good idea about the lace trim and, as you say, an excellent opportunity to look at haberdashery!
LikeLike
Wow! This is stunning! You’ve gone the extra mile with this skirt. Love the zip and the binding!
LikeLiked by 1 person
Glad you like it! I just need lots of parties to go to – and to make the purple top I was planning to go with it, although I quite like it with black too.
LikeLike
You know I only noticed the spot thing when you mentioned you were almost late with it on ig, but I’m pleased the hostess beat her target! The skirt looks fab and I love that the binding exaggerates it’s shape. Great party or daytime skirt. That shape would look great in denim.
LikeLiked by 1 person
Thanks Linda. I’ve got some lovely selvedge denim that I think would work for this skirt as it needs something that can hold its shape.
LikeLiked by 1 person
I can’t tell you how much I love this skirt it’s absolutely perfect!
LikeLiked by 1 person
Thank you Su! I’m pretty chuffed with it and can’t wait to wear it!
LikeLike