Refashion #3

As previously mentioned, I seem to have become a Refashioning addict and can’t stay away from rails of men’s shirts in charity shops!  This is my third Get Shirty project and will be the last before the deadline for the community challenge, although definitely not the last ever.

I think one of the main benefits of the three projects has been the opportunity to experiment, sometimes successfully and other times not.  There is one pale green linen shirt, sans sleeves, lurking in a corner which has been pinned, re-pinned, generally faffed around with and finally abandoned.  I will use the fabric for something eventually but I don’t want to look at it again for the time being.

For this project I reverted back to the pattern I used the first time round for this top which is a bit unadventurous but this is a shape that I really like and I know I will get use out of it.

I had planned to make something more like a jacket keeping the buttons at the front.  With all three refashions I’ve decided to keep the button band intact because it seems such a waste not to but I need to branch out a bit more!   The jacket plan didn’t work out because the top doesn’t look right unbuttoned.  However, I’ve already worn the refashion twice and after a day in the office I’ve decided that I’m really pleased with it.  It is slightly strange buttoning up the ‘wrong’ way but I can live with that.

Here’s what I started with.  Its a really good quality fabric and I love the colour and the stripes.  It was only £3.99 but I can’t remember where from (I’ll confess to having bought two other shirts on the same day so lost track of locations).  I’d already removed the pocket when I remembered I needed to take a Before photo.  There is a very faint reminder on the fabric of where the pocket was but I’m hoping it will gradually disappear with washing.

The construction was pretty much the same as last time except that I re-traced the pattern as a size 6 for a more fitted shape.  The differences/improvements were :

  • I used French seams throughout.  I don’t think I’ve ever done these on garments before, only shopping bags, and I was so pleased with the result.  I wasn’t sure how they would work for inserting the sleeves but it was easier than I thought.  I had to pin the sleeves on while Doris was wearing the top to make sure I got the wrong sides together first time round.  I love how neat everything looks inside.
  • I made false cuffs on the sleeves.  This is my new favourite thing because it is so quick and effective and works well for ¾ length sleeves.  I don’t like sleeves that get in the way, which they often do because of my short arms!
  • I changed the buttons.  The existing ones were a bit too shiny and plasticy and had the brand name printed on them so I found some stripy ones for £1 (for 8) at The Eternal Maker.
  • The shirt had a different, narrow striped fabric on the inside of the cuffs and yoke and I was able to use this for the back facing.  You can’t see it but I know it’s there!
  • I used the free fabric marking pen from Love Sewing magazine to keep my top stitching neat and ensure that it caught the facing all the way round.  I pinned the facing on the reverse and then drew a line with the white pen on the right side over the pins, took out the pins and then sewed.  Basic stuff but I hate it if I go off piste.  On the subject of sewing magazines, I do seem to have got a bit sucked in lately to buying these each month, I’m so easily tempted by the free patterns etc.  Having just checked the Love Sewing website to make sure I was mentioning the right magazine I found a link to a tutorial for a Japanese style apron from The Hearty Home which I’ve been looking for since spotting this one from Toast.  I might never have found it if I hadn’t bought the magazine!

What I need now is a project to use up discarded shirt pockets!  Any ideas?

Made Up Meet Up

Having not only created the Made Up Initiative to raise funds for the National Literacy Trust, Karen from did you make that also organised a Meet Up in London on Saturday for those taking part.

Not one to miss out on the opportunity to spend a day in London, W came with me (not to the Meet Up!).  I wore the Brumby skirt I’d pledged to make and my latest Get Shirty Refashion (not yet blogged) and W wore an eye-catching combination for safety reasons as he was planning to hire a ‘Boris Bike’ for getting around.  I wasn’t keen to join him on two wheels so in the end we agreed to walk.

As we passed Portland Place he spotted three young people playing table tennis in the World Piazza at the front of Broadcasting House.  He will play table tennis at any opportunity so asked if they wanted a game of doubles – and they said yes!

I just loved the very stylishly dressed man who sat down in the foreground with his yellow coat, striped socks and floral tie.  The boys seemed genuinely disappointed when I dragged W away.

The Meet Up was in the Parcel Yard on the concourse at Kings Cross Station.  It was rather exciting actually meeting Karen as I’ve been following her blog for a long time and she is just lovely!  She was a very generous host, not only providing refreshments but also bringing along fabric and patterns from her stash to give away.  Her Vogue dress was fabulous.  You should look at it in more detail here.

At 1.30 there was a draw for the three prizes which Karen managed to broadcast live on Periscope despite the thickness of the building’s walls making internet access somewhat intermittent.

This was the first meet up I’ve been to and it was great talking to other bloggers including these three pictured with Karen.

image

left to right Gill from vintagerockchick had made a Mortmain dress but didn’t wear it as she is saving it for her great niece’s christening.  She’d brought along a photograph of the dress and a piece of the fabric which was gorgeous.  Kate from Fabrickated was wearing this coat (but not in the photograph sadly, it was lovely) and Tamsin from pimp my curtains had taught herself to knit recently and made this scarf – which was far too cosy to wear on Saturday.

Next stop was extracting W from a beer festival round the corner from the station and heading for a late lunch at The Grain Store.  Very lively location but rather random service.  We then made our way along the Regent’s Canal to Camden Market before heading back to Victoria.  At the start of this walk we came across a lady in a narrow boat selling home baked cake.  Who could resist?

According to the Health App on my iPhone we clocked up around 23,000 steps during the day which entitled us to do almost none on Sunday!  The Brumby skirt was more comfortable than I thought it would be given the somewhat rigid nature of the fabric, although there was a slight pocket failure when the additional securing stitches on one side came adrift.  Too much shoving of hands in pockets + poor stitching.  Easily rectified.

A great day and a big thank you to Karen for organising the fundraising initiative and the Meet Up.

The Refashioners 2015 #2

This has not been an entirely happy Refashion.  I don’t really know why, it should have been so easy – it’s only a skirt after all.  Here’s what I started with.  100% linen for £4 which can’t be bad.

Having successfully incorporated the button band into my previous Refashion (which I have worn a lot) I decided to do the same with this one.

I toyed with the idea of having the buttons at the back but decided they might be a bit uncomfortable to sit on!

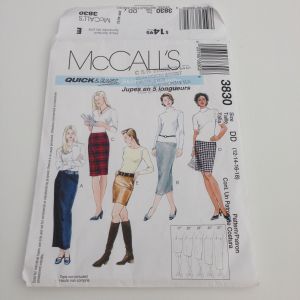
McCalls 3830

I used this pattern as it is pretty basic and requires a fairly small amount of fabric.  This shirt was a lot smaller than the last one.  I normally go for View D but the final version is more View E!

This is what I did :

  • Unpicked the pocket.
  • Unpicked the sleeves rather than chopping them off because I needed every last centimetre of width to fit the front piece of the pattern on.
  • Traced the front pattern piece in one sheet rather than trying to cut the shirt on the fold.  I’ve since read Zoe’s tip here for re-cutting shirts which I will try next time (if there is a next time!).
  • Cut out the front and back pieces of the skirt from the shirt front and back.
  • Split the front facing in two to accommodate the button band and extended each piece by ⅝ at the centre.
  • Reduced the back facing by ⅝ and cut on the fold.  I cut both facings from the sleeves.
  • Assembled the skirt as usual.
  • Added a lining when I realised how see-through the fabric was.  I had a remnant of white cotton lining which had a couple of marks on it that wouldn’t come out in the wash so I thought this was an appropriate project to use it up on.  I attached the lining to the facing and then stitched along the existing stitch line of the button band to secure it at the front.
  • Decided that the finished article looked a bit boring and, as I wasn’t really loving it, experimented with some of the fancy stitches on my sewing machine and added a border round the top.
  • Left the little label from the side of the original shirt and incorporated it into the hem – just because.

What didn’t work as well as I hoped :

  • Because there wasn’t quite enough width in the shirt at the sleeve seams I had to position the top of the front pattern piece quite close to a button hole and, once assembled, it was too close to the top of the skirt.  I had to sew up the original hole and stitch a new one.  I have a phobia of button holes and this one wasn’t great.  I was sewing through more than one layer of fabric and I also forgot to change the thread from white to grey to match the others so this one stands out rather too much.  I should pretend it’s white to match the border.
  • The finish on the top of the button band is not great and in general the button band is a bit wiggly.  I found this fabric really hard to sew with because it changed shape at the slightest opportunity despite my stay-stitching all the pieces before I started.
  • I decided to try and create interesting pockets using either the collar or the cuffs from the original shirt.  I can’t tell you how many times I faffed around with different ideas, none of which worked out quite how I wanted.  I’m not giving up on this idea, I know I can work something out in the end with a bit more time and thought.  Consequently the skirt has just one pocket – which is the original one from the shirt.  I’m quite happy with this but I’m surprised there are no holes in the fabric from all the unpicking that went on!  I did add a second pocket saved from the previous Refashion but the arbiter of all things sewing, Mr W, advised against it – so that resulted in more unpicking.
  • The fancy border round the top is a bit wobbly.  I really shouldn’t sew late at night when my concentration levels are flagging.
  • The skirt is probably a bit too short.  Another holiday skirt I think.

Here’s the result.  Let’s hope you don’t notice too many other faults!  I have slipped in a tiny picture of me wearing it – before I changed into something more work-appropriate.  I think it looks better on than off but that’s probably because you can’t see the top of it – this is a first attempt at getting over one of my other phobias which is having my photograph taken!

W was very complimentary about the skirt this evening so I’m suddenly feeling more positive about it. Before I wear it I think I will sew up between the bottom four buttons and pop in a couple of press studs between the top ones to eliminate gapping when I sit down.

I noticed when I was picking up some sailing kit from the laundry yesterday (work-related, I do my own washing!) that I was eyeing up a rail of just laundered shirts and wondering which one might make a nice refashion!  I need to move on to something different …